Choosing the right Drywall Screw is a small specification decision with consequences across an entire project. Screw length, thread pattern, head design, and coating must suit the board, framing, installation method, and exposure conditions. A screw that works well in timber may perform poorly in light-gauge steel. The wrong length can also leave the board loose or damage its face. Small details matter.
Global projects add another layer. Materials, climate, available fasteners, and project specifications differ by region. The UNEP and GlobalABC Global Status Report for Buildings and Construction 2024/25 reports that buildings and construction accounted for 32% of global energy use and 34% of global carbon dioxide emissions in 2023. Those figures do not measure screw performance, but they underline why durable assemblies and avoidable rework deserve attention. Replacing a failed fastener can mean more than opening a tool case; it may require repairs, labor, and replacement board.
Reliable selection starts with the actual assembly, not a generic product label. ASTM C1002 covers specified steel screws for attaching gypsum board to wood or light-gauge steel framing; ASTM C954 addresses drill screws for gypsum board on steel framing. Project teams should confirm the current standard, local requirements, and manufacturer guidance before specifying. Corrosion exposure matters, too. A coating suitable for a dry interior may not suit a humid site. There is no universal shortcut. Even a tidy rule of thumb can miss an unusual substrate or installation condition. That is worth checking.
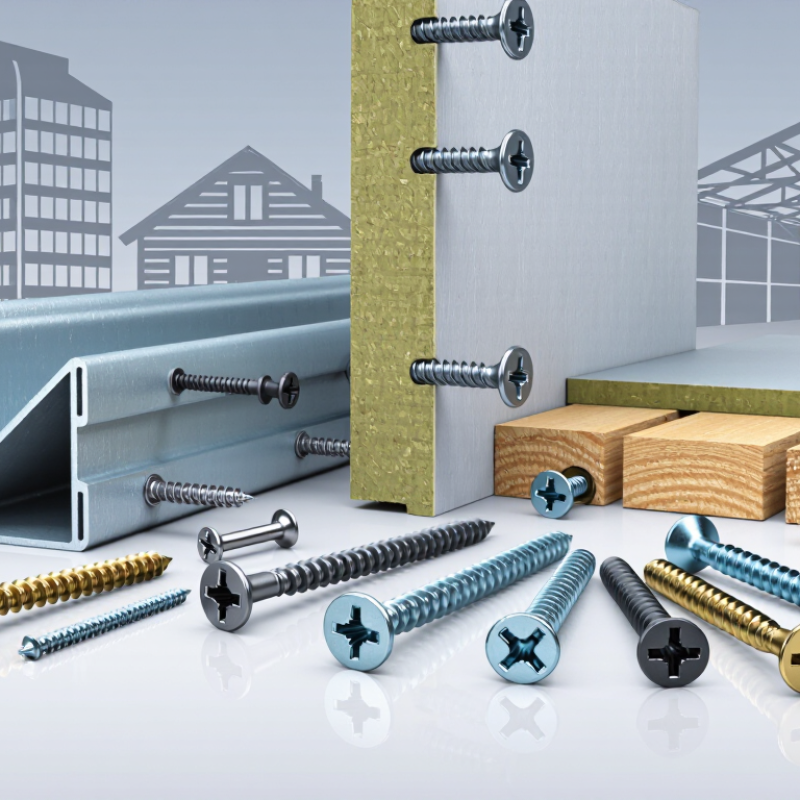
Drywall screws look similar, but their functions differ sharply. Coarse-thread screws grip wood studs with fewer turns. Fine-thread screws suit light-gauge steel framing and reduce thread deformation. Self-drilling points create their own openings in thicker steel sections. Cement-board screws use harder cores and corrosion-resistant finishes.
Head design also matters. A bugle head sits nearly flush without tearing the paper face. The correct length should penetrate the framing securely, but not extend dangerously behind it. ASTM C1002 covers screw requirements for gypsum board applications, while EN 14566 addresses mechanical fasteners in gypsum plasterboard systems. These standards support comparison, not automatic approval for every country.
Project scale makes consistency essential. The U.S. Census Bureau reported about 1.45 million privately owned housing completions in 2023. Small fastening errors can multiply across thousands of rooms. UNEP’s 2023 Global Status Report stated that buildings represented 37% of global energy and process-related emissions in 2022. A stable drywall assembly supports long service life and fewer repairs. Still, coating selection deserves more attention in humid or coastal locations. I would not trust a catalog alone. Check substrate thickness, exposure, torque, and pull-out performance on site. A trial panel can reveal problems early. That step is often skipped.

Choosing drywall screws starts with the wallboard and framing, not a universal length chart. The Gypsum Association’s GA-216 installation standard calls for at least 5/8 inch of screw penetration into wood framing and 3/8 inch into steel framing. Add panel thickness to that requirement, then check the screw manufacturer’s specifications. A 5/8-inch panel over wood needs more length than a 1/2-inch panel. Too-short screws can loosen; overly long ones may strike services behind the wall. That gap matters.
Match the thread to the frame. Coarse threads generally grip wood well, while fine threads suit steel studs. For thicker steel, check the framing gauge and select a compatible drill-point screw; a sharp point may not pass through reliably. ASTM C1002 and C954 distinguish screw applications for gypsum panels and metal framing, so verify the applicable specification rather than relying on appearance. On mixed-material projects, test a sample assembly and inspect the screw head: it should sit just below the paper surface without tearing it. I still treat published guidance as a starting point, not a substitute for checking the actual board, frame, and installation conditions.
| Wallboard Material and Application | Typical Board Thickness | Recommended Screw Length | Thread Selection | Point Type | Key Selection Notes |
|---|---|---|---|---|---|
| Standard gypsum board on wood studs | 12.5 mm (1/2 in) | 32 mm (1-1/4 in) | Coarse thread | Sharp point | Coarse threads provide strong purchase in timber. The screw should penetrate the wood framing sufficiently without protruding excessively. |
| Standard gypsum board on wood studs | 15.9 mm (5/8 in) | 41 mm (1-5/8 in) | Coarse thread | Sharp point | A longer screw maintains adequate embedment after passing through the thicker board. |
| Standard gypsum board on light-gauge steel studs | 12.5 mm (1/2 in) | 25–32 mm (1–1-1/4 in) | Fine thread | Sharp point for thin steel; drilling point for thicker steel | Fine threads are designed to engage metal framing. Confirm the stud thickness and the screw manufacturer’s capacity before selecting the point style. |
| Standard gypsum board on light-gauge steel studs | 15.9 mm (5/8 in) | 41 mm (1-5/8 in) | Fine thread | Sharp or drilling point, according to steel gauge | Use a screw long enough to pass through the board while maintaining reliable engagement in the metal stud without excessive penetration behind the framing. |
| Two layers of gypsum board on wood framing | 25 mm (1 in) total | 54–64 mm (2-1/8–2-1/2 in) | Coarse thread | Sharp point | Select the length according to the total board thickness and the required wood embedment. Follow the tested assembly specification where fire or acoustic performance is required. |
| Moisture-resistant gypsum board in interior wet areas | 12.5–15.9 mm (1/2–5/8 in) | 32–41 mm (1-1/4–1-5/8 in) | Coarse thread for wood; fine thread for steel | Sharp or drilling point, according to framing | Use corrosion-resistant fasteners suitable for the exposure. Moisture-resistant gypsum board is not automatically suitable for continuously wet or exterior conditions. |
| Type X gypsum board for fire-rated assemblies | 15.9 mm (5/8 in) | 41 mm (1-5/8 in) | Coarse thread for wood; fine thread for steel | Sharp or drilling point, according to framing | Fastener type, spacing, penetration, and board layers must match the tested fire-resistance design. Do not substitute based on thickness alone. |
| Glass-mat or fiber-reinforced gypsum sheathing | 12.5–15.9 mm (1/2–5/8 in) | 32–41 mm (1-1/4–1-5/8 in) | Framing-dependent; corrosion-resistant finish often required | Self-drilling point for steel or sharp point for wood | Use fasteners specifically approved for the board system and exposure. Exterior sheathing applications may require enhanced corrosion protection. |
| Fiber-cement board or cement backer board | 6–13 mm (1/4–1/2 in) | 32–41 mm (1-1/4–1-5/8 in) | Board-specific thread, commonly high-low or coarse thread | Self-drilling or notched cutting point | Do not use ordinary gypsum drywall screws. Select corrosion-resistant cement-board screws with a compatible head and cutting point. |
| Acoustic or high-density gypsum board | 12.5–15.9 mm (1/2–5/8 in) | 32–41 mm (1-1/4–1-5/8 in) | Coarse thread for wood; fine thread for steel | Sharp or drilling point, according to framing | Use the fastener and spacing specified by the board system to avoid reducing acoustic performance or damaging the dense core. |
Choosing a drywall screw for global projects starts with identifying the substrate, not the screw box. Gypsum board fixed to timber needs coarse threads that bite deeply. Steel framing usually requires fine threads and a sharper point. For cement-based surfaces, use a tested anchor system instead of forcing a standard drywall screw. I once selected a screw by length alone. That assumption was wrong.
Load requirements also change the specification. A ceiling panel, partition, or service-access cover may face different pull-out and shear forces. Check board thickness, framing gauge, and expected fixture weight before choosing screw diameter and length. The screw should penetrate the framing securely without damaging hidden services. For heavier fixtures, add blocking or use a rated fastening method. Small tests help. A trial panel can reveal spinning, cracking, or poor thread engagement before installation spreads across a site.
Installation conditions deserve equal attention. Humid rooms, coastal air, and temperature changes can accelerate corrosion, so select a suitable protective finish and verify its environmental rating. Clean, dry surfaces improve seating and reduce slipping. Set the driver clutch carefully; excessive torque can tear the paper face and weaken the joint. On large projects, I record screw type, spacing, tool settings, and site conditions for quality checks. Local construction requirements still need review. Field experience is useful, but it is not a substitute for project-specific testing. I still question fast choices made under schedule pressure.
The chart shows typical screw-length ranges used for common drywall applications. Coarse-thread screws are generally selected for wood framing, while fine-thread screws are commonly used with light-gauge steel framing. Heavier boards, multiple layers, and higher loads require longer screws and verification of the required embedment, corrosion resistance, and local building-code requirements.
Planning reference: screw lengths are typical nominal values in millimetres, not project-specific structural design values. Confirm substrate thickness, minimum embedment, pull-out requirements, corrosion exposure, and installation torque before procurement.
Choosing a drywall screw for an international project starts with the destination’s standard, not the supplier’s catalogue. Check whether the specification follows ASTM C1002, EN 14566, or another local system. These standards may differ in thread geometry, mechanical performance, dimensions, and testing methods. Do not assume approval in one market guarantees acceptance elsewhere. Ask for current test reports, declarations, and traceable batch information. That paperwork matters on remote projects. It also exposes missing data early.
Coating selection should match the actual exposure. For dry interior rooms, a suitable phosphate or zinc finish may provide adequate protection. Bathrooms, kitchens, coastal buildings, and unheated storage areas need closer review. Persistent humidity can attack exposed edges after installation. In corrosive environments, specify a tested corrosion-resistant coating and confirm compatibility with framing and joint compounds. A bright surface is not proof of durability. Check salt-spray results carefully; laboratory hours do not directly predict service life.
On site, inspect the screw head, recess, and threads before large-scale installation. Poor engagement causes cam-out, damaged boards, and uneven finishing. For a warehouse near the coast, I would request sample panels and humidity or salt-exposure testing. Small trials reveal problems that datasheets miss. Still, this process is not perfect. Local workmanship, storage conditions, and cut edges can change performance. Record the selected standard, coating, lot number, and installation tool settings. That record supports quality checks when conditions change.
Planning starts before the purchase order. Different regions may use gypsum boards, metal studs, or timber framing with varied thicknesses. I have seen projects delayed because a screw fitted the board but failed in the framing. Confirm thread design, screw length, head shape, point type, and corrosion protection with local installation teams.
A reliable sourcing plan uses approved samples from more than one qualified supplier. Ask for material declarations, coating details, dimensional reports, and batch traceability. Independent testing should check pull-out strength, torsional resistance, hardness, and corrosion performance. Quality control must continue after approval. Inspect random cartons, verify counts, and record lot numbers before shipment. Small packaging errors can create large site problems.
Tips: Match the screw to the substrate, not only the board. Test samples under real site conditions, including humidity and temperature changes. Keep a written acceptance standard for every destination. Check compatibility with automatic screwdrivers and local tools. Do not assume one specification fits every market. I once underestimated regional installer preferences; the product passed laboratory checks but slowed installation. That mistake deserved more attention. Keep spare samples for future comparisons. Also, review transport packaging, because damaged coating can reduce performance before installation.
You are using an outdated browser. Things may not appear as intended. We recommend updating your browser to the latest version.
Close